Subscribe to our ▶️ YouTube channel 🔴 for the latest videos, updates, and tips.
Construction of Perpendicular Lines
Construction of perpendicular lines by using a protractor is discussed here.
Perpendicular lines are lines that intersect at right angles (90°).
The symbol '⊥' means "is perpendicular to".
For example: The corners of a room walls are perpendicular to each other.
I: Construction of a Perpendicular Line to a Line Through a Point on it:
First Method: Using Scale/Ruler and Set-Square
You are given a line, say \(\overline{AB}\). Can you draw a perpendicular line to \(\overline{AB}\) on a point P (say) of it? Follow the Working Rules given below to draw such perpendicular line.
Working Rules for Construction of Perpendicular Lines using Scale and Set-Square:
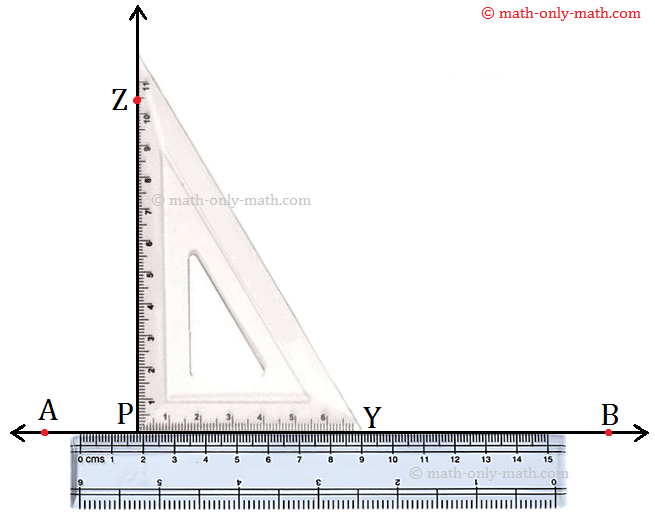
Step 1: Place a scale along the line AB as shown in the following figure.
Step 2: Place the set-square with its shortest side along AB above the scale.
Step 3: Slide the set-square firmly along \(\overleftrightarrow{AB}\) until its point Z coincides with the given point P
Step 4: Holding the set-square firmly, trace the line \(\overleftrightarrow{PZ}\) along the edge of the set-square. Thus, PZ is perpendicular to AB at P. We can write it as \(\overleftrightarrow{PZ}\) ⊥ \(\overleftrightarrow{AB}\)
Second Method: Using Scale/Ruler and Set-Square
Follow the Working Rules given on the following to draw a perpendicular line to a line segment, say AB, using ruler and compass.
Working Rules for Construction of Perpendicular Lines using Scale and Compass:
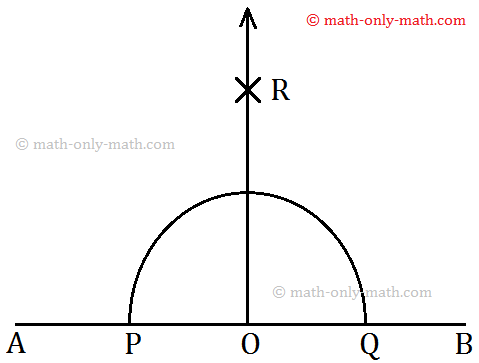
Step 1: Mark a point O on AB. With O as centre and a suitable radius, draw an arc to cut \(\overline{AB}\) at P and Q.
Step 2: With P as centre and taking a radius of more than PO, draw an arc on one side of \(\overline{AB}\).
Step 3: With Q as centre and taking the same radius, draw another arc to intersect the previous arc at R.
Step 4: The line through R and O is drawn. Now, \(\overleftrightarrow{OR}\) is the required perpendicular to \(\overline{AB}\) through O.
II: Construction of a Perpendicular Line Through a Point Not on it:
First Method: Using Scale/Ruler and Set-Squares:
Let us draw a perpendicular line to a line AB (say) from an outside point P.
Working Rules for Construction of Perpendicular Lines using Scale and Set-Square:
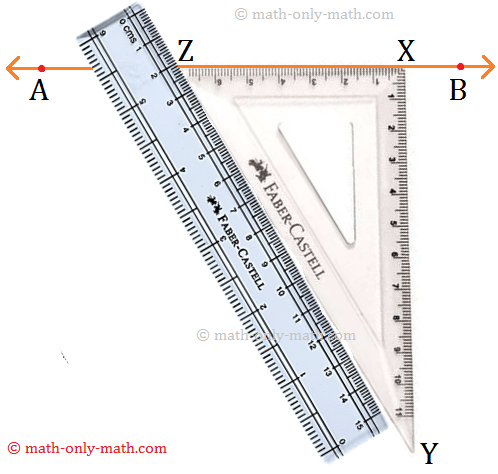
Step 1: Place a set-square XYZ just below the line AB in such a way that one of its sides containing right angle touches the line.
Step 2: Hold the set-square firmly and place a scale such that its edge is positioned along YZ of the set-squre.
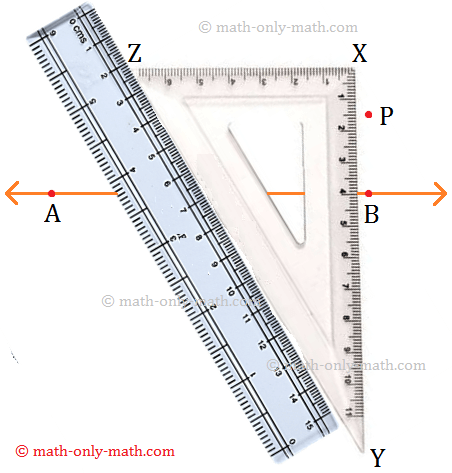
Step 3: Holding the ruler firmly, slide the set- square along the scale until the side XY of the set square passes through the given point P.
Step 4: Keeping the set-square in this position, trace the line XY along the edge of the set- square. Thus, XY is the perpendicular line to the given line AB passing through the point P.
Second Method: Using Scale/Ruler and Compass:
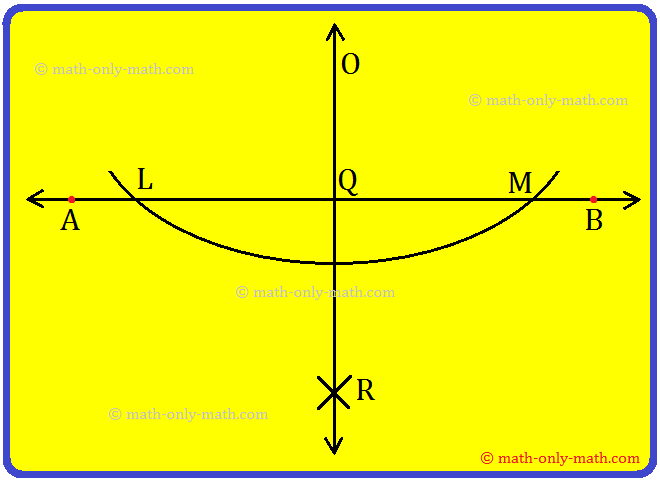
Let us draw a perpendicular line to a line AB (say) through a point O located outside the line.
Working Rules for Construction of Perpendicular Lines using Scale and Compass:
Step 1: Draw \(\overline{AB}\) of any length and mark a point O outside it.
Step 2: With O as centre and a suitable radius, draw an arc to cut \(\overline{AB}\) at Land M respectively.
Step 3: With L as and taking a radius greater than \(\frac{1}{2}\)\(\overline{LM}\). draw an arc.
Step 4: With Mas centre and the same radius as in step 2, draw another arc to cut the previous arc at R.
Step 5: Join OR which intersects AB at Q.
Now, \(\overline{OQ}\) the required perpendicular from an external point O to AB.
III: Construction of a Perpendicular Line by Using a Protractor:
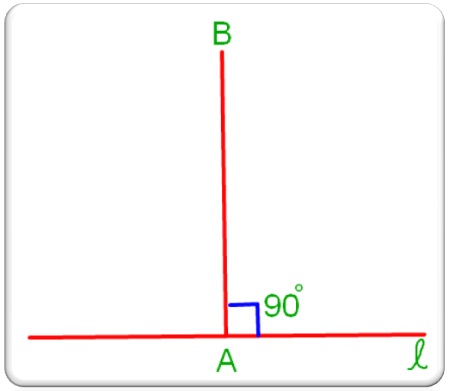
To construct a perpendicular to a given line ℓ at a given point A on it, we need to follow the given procedure for constructing an angle of 90° at A.
Steps of construction:
1. Let ℓ be the given line and A the given point on it.
2. Place the protractor on the line ℓ such that its base line coincides with ℓ, and its centre falls on A.
3. Mark a point B against the 90° mark on the protractor.
4. Remove the protractor and draw a line m passing through A and B.
Then line m ┴ line ℓ at A.
These are the steps to construct a perpendicular.
Solved Examples on Construction of Perpendicular Lines:
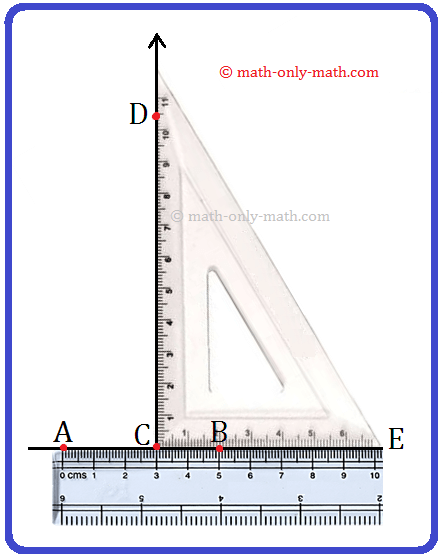
1. Draw a line segment \(\overline{AB}\) = 5 cm and mark a point C on AB such that \(\overline{AC}\) = 3 cm. Draw a perpendicular to at C by using scale/ruler and set-square.
Solution:
It is given that \(\overline{AB}\) = 5 and \(\overline{AC}\) = 3 cm
Using the above Working Rules, the required perpendicular CD is drawn on AB at C,
i.e., \(\overline{CD}\) ┴ \(\overline{AB}\).
2. Draw a line segment CD = 7.5 cm. Mark any point P outside CD. Draw a perpendicular from P to the line segment CD and measure the perpendicular distance from P.
Solution:
Steps of Construction:
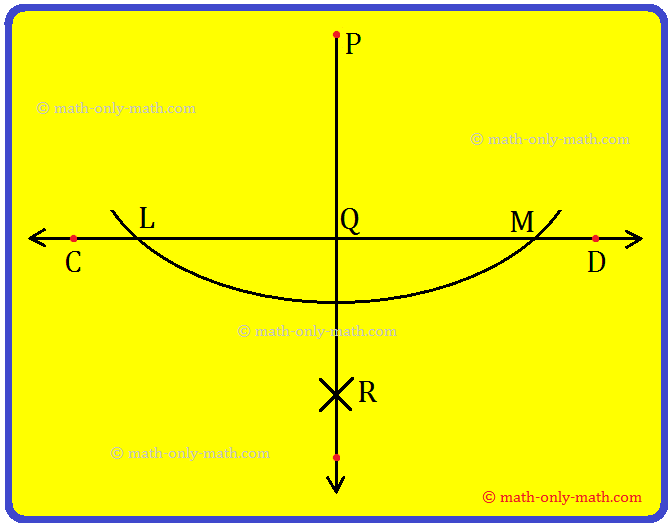
Step I: Draw \(\overline{CD}\) = 7.5 cm and mark a point P outside it.
Step II: With Pas the centre and a suitable radius, draw an arc to cut \(\overline{CD}\) at L and M respectively.
Step III: With L as centre and taking a radius greater than 1/2 LM, draw an arc.
Step IV: With Mas centre and the same radius as in step 3, draw another arc to cut the previous arc at R.
Step V: Join PR which intersects CD at Q. Now, \(\overline{PQ}\) is the required perpendicular from an external point P to CD.
Also, PQ is the perpendicular distance from the external point P to the point Q on \(\overline{CD}\). Measure PQ to find its length.
Worksheet on Construction of Perpendicular Lines:
1. How many lines can be drawn which are perpendicular to a given line and pars through a given point
(i) lying on the line?
(ii) lying outside the line?
2. Draw a line segment AB. Mark any point C, on it. Through C, draw a perpendicular \(\overline{AB}\):
(i) using set-square
(ii) using compasses
3. Draw a line segment PQ = 8.5 cm and mark a point A on it such that \(\overline{PA}\) = 6.5 cm. Draw a perpendicular to \(\overline{PQ}\) A.
4. Draw a line segment CD = 8 cm. Mark any point P outside the \(\overline{CD}\). Draw a perpendicular from P to line segment CD and measure the perpendicular distance from P.
5. Draw a line segment AB = 8.5 cm. Taking a point C on \(\overline{AB}\) such that \(\overline{BC}\) = 5 cm, draw a perpendicular to AB at C.
Construction of Perpendicular Lines by using a Protractor.
Sum of Angles of a Quadrilateral.
Practice Test on Quadrilaterals.
5th Grade Geometry
5th Grade Math Problems
From Construction of Perpendicular Lines by Using a Protractor to HOME PAGE
Didn't find what you were looking for? Or want to know more information about Math Only Math. Use this Google Search to find what you need.



New! Comments
Have your say about what you just read! Leave me a comment in the box below. Ask a Question or Answer a Question.